SimpleDivX has 8 tabs located near the top of the program,
each labeled with both numbers and a description. This guide will walk you
through the program one tab at a time.
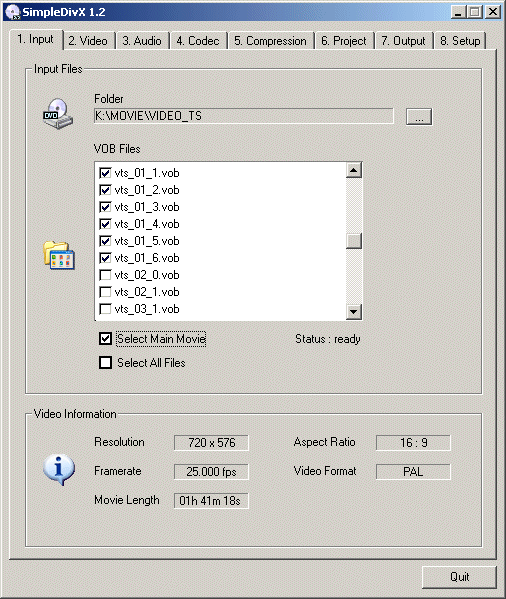
When you first open SimpleDivX it should look similar to the picture below:
Tab 1: Input
Folder:
Click the small box located off to the right and the box pictured below should
appear.
Select the same folder you ripped your vob files to using smartripper or
another ripping tool, then click ok.
Vob Files:
If you used the "files" tab when running smartripper you can check the "select
all files" box, if you used the "movie" tab or perhaps a different ripping tool
you should check the "select main movie" box. It's also possible to select the
vob-files one by one.
Video Information:
This box will tell you all the relevant video information about the DVD you are
backing up. Very cool indeed :)
Tab 2: Video
Frames/Second (fps)
Here you select your desired *output* framerate PAL users will select 25.000,
while NTSC users will select 23.976 or 29.970. SimpleDivX does normally select
the detected framerate from the vob files.
Enable Video Stream ID checking:
This option will automatically detect the ID from the main video stream.
(Normally 0xE0)
Auto-Retrieve Crop And Resizing Info:
Select the checkbox : "Auto-Retrieve cropping resizing info" to automatically
find the correct aspect ratio and fill in automatically the resizing and
cropping values.
Output Format:
Select an output format that suits your needs. Several popular resolutions are
provided, or you can select 'custom' and input your own.
Open VOB Bitstream at LBA
(Advanced Users): Select this if you want to start the dvd movie at a specific
LBA.
Frames Range:
Here you can input the exact amount of frames you want encoded. This is very
usefull for encoding short clips and then viewing in a player to determine
quality.
Advanced Video Settings
When pressing the "Advanced" Button, the following sub-menu pops up :
Postfilter Quality:
- High , higher quality/slower encoding time
- Low , lower quality/faster encoding time
(Leave it to 'High' for best results.)
Reference Quality:
The differences between each of these is very hard to explain, but we can clear
up a few misconceptions. Put simply, IDCT is used for decoding Discrete Cosine
Transform.
We suggest using the following depending on your processor type: Pentium w/mmx: 16-bit MMX ichen PentiumII: 32-bit MMX PentiumIII: 32-bit MMX PentiumIV: 64-bit FPU K6-2/3: 16-bit MMX ichen Athlon/Duron: 32-bit MMX Athlon XP: 32-bit MMX
Output Mode:
SimpleDivX can output a variety of formats, but we recommend you use yv12 since
DivX / XviD is the only codec currently supported by SimpleDivX.
Tab 3: Audio
Create Audio:
Uncheck this box if you don't want SimpleDivX to create audio for your video
file.
Enable Audio Stream ID checking:
When this is enabled, only found and valid audio streams can be selected and
converted. (It is recommended that you leave this option on.)
Extract all AC3 Audio Streams:
This will extract all the audio streams in the movie.
*NOTE* Only the highlighted Audio Stream ID will be multiplexed with the video.
Audio Stream ID:
This lists all the audio streams present in the movie. The main audio will
almost always be 0X80, while the others will *usually* be alternate
languages/commentary/special audio.
Audio Language:
When the *.ifo files are also copied from the DVD, SimpleDivX will be able to
tell you exactly what language the selected audio stream contains.
Audio bitrate:
Usefull in deciding wether to compress the audio or not.
Audio Format:
MP3: Compresses audio with MP3 format. (Stereo only)
AC3: Retains original audio quality. This can be Dolby-Digital Stereo, 5.0 or
5.1 channels sound. It is possible to choose 6 or 2 channels.
OGG: Compresses audio with OGG format. (Stereo only)
Audio Compression kbps:
Choose here the compression from the audio stream. For Mp3 128 / 160 kbps is
recommended.
When you choose Ogg compression, the audio quality is much better at low
bitrates, so for 1-cd movies you can choose 64kbps. Normally you can choose 112
/ 160 kbps.
When AC3 is choosen as audio format, it is possible to recompress this stream
with a lower bitrate. But for a 6 channel movie is it recommended that you
choose a minimum from 256kbps.
Samplerate Conversion
For Mp3 and Ogg it is possible to choose 48000 or 44100khz as sample-rate.
Normally you would leave it to 48000 unless your sound-card cannot handle
48000khz.
Amplify
Check this to amplify the sound with some dB. It is not recommended to choose a
higher value then 3dB, or else you will hear some clipping of the sound in loud
parts.
Peak level normalize
When this option is enabled, the sound will be normalized to 100% (This means
that the loudest audio parts will be 100%, so this means no clipping.)
Peak level normalize [midnight mode]
When this option is enabled, the sound will be normalized to 100% and the
softer audio parts will be amplified some more.
Tab 4: Codec
1-Pass DivX file:
1-pass DivX files are created using constant bitrate, which means every frame
in your movie will have the exact same bitrate.
2-Pass DivX file:
2-pass DivX files are created using variable bitrate, which means high-motion
scenes get more bitrate than low motion scenes. This results in a much better
quality movie than 1-pass but takes roughly 2x longer to encode.
Do Only First Pass:
SimpleDivX will only create the first pass of the movie, when it is complete
you will have to come back to this tab and select 'Do Only Second Pass'. This
is usefull when you do only have a limited computer time available.
Codec Advanced Settings
Global Motion Compensation:
GMC helps in zooming and panning scenes.
Quarter Pixel:
Quarter pixel increases the accuracy of macro blocks within your film.
Bidirectional Encoding:
Can help increase compression in some scenes by using forward and backward
prediction of frames.
De-Interlace
Use the de-interlace functionality from DivX 5.X PRO.
Tab 5: Compression
(The above picture is just a sample)
Get Time From Movie:
This feature will attempt to read the length of the movie from the .vob files.
It is not always accurate however, so if it is wrong, input the length
specified on the back of the DVD case.
(End Credits Options)
SimpleDivX offers three ways to deal with the end credits.
- You can compress them normally (uses same bitrate as normal movie)
- not include them at all
- recompress them with a lower bitrate (thus saving more bitrate for the movie
itself).
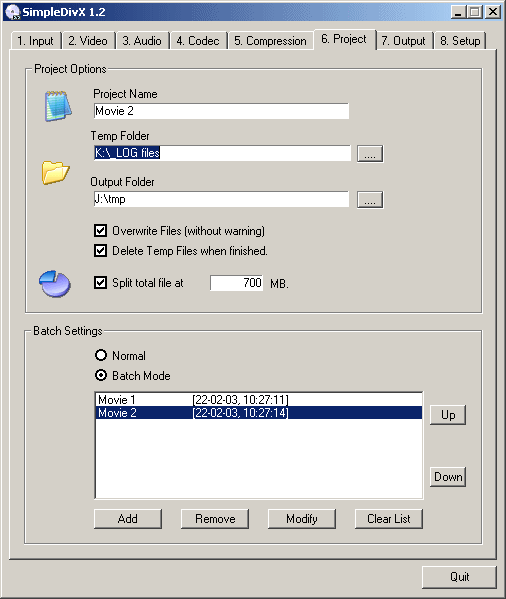
Tab 6: Project
Project Name:
Type the name from the movie you want to make. You may set project name to
whatever you like, most people just use the name of the movie. This will
automatically name most of your output files to the project name, unlike some
tools that will name things 'movie1.avi' etc.
Temp Folder:
This is where the temp video, audio and logging files will be saved.
Output Folder:
This is where your completed file will be put. (This can be a *.avi or a *.ogm
file.)
Overwrite files:
Select to automatically overwrite the destination files.
Delete temp-files:
Select this to automatically clean-up the generated temp files from SimpleDivX.
Split Total File:
If you are making a 2CD rip SimpleDivX can split the file for you
automatically.
Normal
In this mode it is only possible to do 1 conversion at the time. (This is
compatibility mode with SimpleDivX 1.1)
Batch Mode
This enabled you to do more conversions from different movies in one SimpleDivX
session.
Tab 7: Output
Shutdown windows
This option does close the current window session and shutsdown the computer.
Press the start button to start the video-processing
Status Information:
This box will keep you informed on the progress of SimpleDivX.
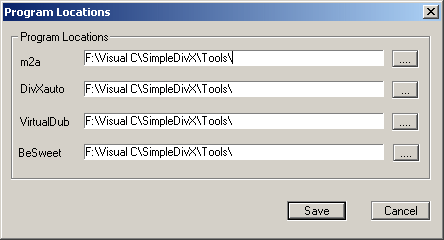
Tab 8: Setup
External Program Locations:
Click the small box off to the right and the box pictured below should appear.
Now change all four paths to where you installed the SimpleDivX/Tools folder.
This box is provided for users that might already have these programs somewhere
else on their computer, but since SimpleDivX always includes the latest
versions we recommend you leave the paths pointed to the SimpleDivX/Tools
installation folder.
Advanced Audio Settings
If the avi / ac3 interleaving is giving some problems, change the interleave
and preload value here.
Priority Settings
Choose here your priority settings for : - Audio
- Video
- Disk (Note : Setting it to a higher value will not automatically mean that it
will run faster ! It's just that SimpleDivX will get more processor-cycles.